A Perth Riviera #4 - to March 2013
Posted by Andrew Crocker on Apr 9th 2013
It is arguable whether work is the curse of the drinking classes, as Oscar Wilde would have us believe, but it is certainly the curse of the amateur boat builder. The requirement to earn a living (in order to pay for the thing in the first place), and the associated need to travel frequently, turned the process of laminating the hull into a longer journey than would normally be the case. Coupled with a Perth summer with its temperatures in excess of 100 degrees F, and a shed that becomes a sauna under these conditions, the long journey feels even longer.
But it all had to be done. So off I went.

Second layer going on to the expoxy coated hull
Laminating is ultimately about process. Turning 22 sheets of 3mm plywood into 150 and 100mm strips, applying glue and then fastening to the hull to obtain the requisite laminate, requires consistent technique as much as anything. Using the “ Gougeon Brothers on Boat Construction” as my guide, I adopted the notched spreader for applying the thickened epoxy resin to the strips which, after some initial futzing with notch depth, gave a good balance of coverage and epoxy quantity. Also following the Gougeons, I epoxy coated each completed layer of laminate which meant that only the new strips required epoxy. This helped keep the mess down to a minimum and seemed to result in a very sound lamination.
Limited fairing was done between layers. Just edge set issues were corrected until the final layer of plywood was completed, at which point there was enough wood to allow a more vigorous correction. The Raptor nylon staples were used throughout the plywood lamination which allowed them to be left in place and simply sanded flat. I moved to normal metal staples for the final laminate of mahogany and the experience made me wonder how I would have survived the plywood lamination if I had had to remove all those staples!
In some senses, laminating is a very unsatisfactory process as the boat seems to be making little progress. After completing a new lamination, the boat looked exactly as it was the lamination before! The only way of seeing the progress was to look at the transom and admire the growing thickness of the hull. But, all good things must come to an end and after what seemed like an eternity (interrupted by endless travel, Xmas, and other activities), three layers on the sides and four layers on the bottom were completed. It was time for the final lamination of mahogany to be dealt with.
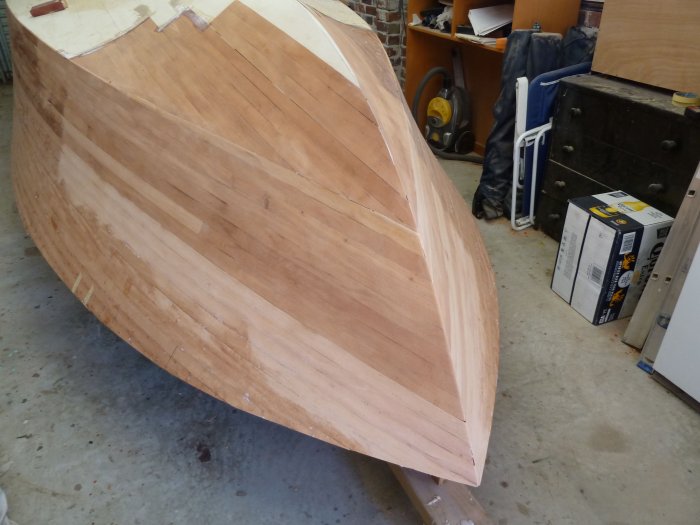
The final stages of the final lamination - 37mm strips of mahogany. The immense variation in color can be clearly seen. Stain will fix all (I hope).
The strips were sawn on my bandsaw using a 3TPI blade which made light work of the 80 odd strips that were required although quite an elaborate setup was required to successfully steer the 2.8M lengths of timber (a 1.5M length of square section steel tube was clamped to the bandsaw table to provide a stable guide and many rollers pressed into service to keep the timber well supported). They were then thicknessed to provide a smooth surface to ease both gluing and final finishing. In common with most other builders, the hull under the waterline (to be painted) was done using 4mm plywood. The only real crisis with the mahogany strips came when the various planks that I was using to create them turned out to be radically different colours. Experiments with staining indicated that this would not be obvious in the end - we shall see.
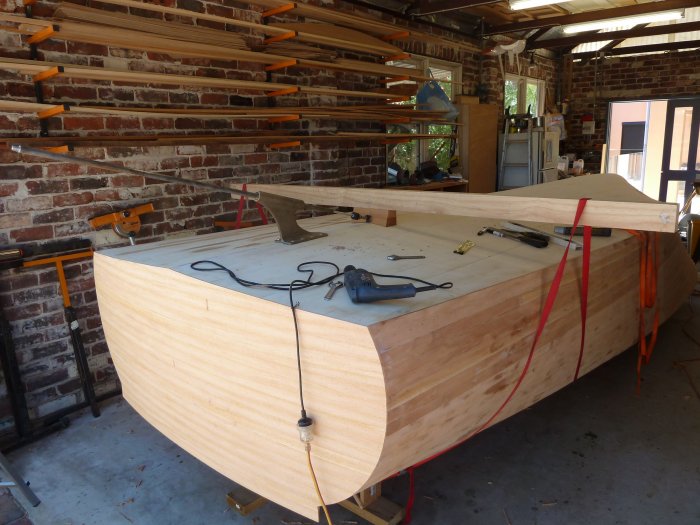
The setup for drilling the prop shaft hole
After an initial sand of the final laminate with a belt sander and 40 grit paper to clean off the glue squeeze out, it was decided to drill the holes for the prop shaft and rudder. These are nervous moments and it seemed better to deal with them while the hull was in a state where mistakes could be rectified. The setup for drilling the hole was the same as that used by many others: a sacrificial wooden block with its face at the correct angle for square entry of the 1-3/8" Forstner bit; the block held down by a wooden beam transverse across the hull and held down by tie-down straps; the strut used as a drill guide with, in my case, 1" brass bearings made to accomodate the 3/4" steel shaft used as a bit extender.
In the end, aside from blunting a cheap drill bit (a lesson I seem never to learn - don't buy cheap tools) the hole appeared slowly but surely and without fuss. The rudder hole was also drilled without event. It was now time for sanding, staining and glassing.
Sanding was done using the random orbital sander. Half way through, I switched from a cheaper Bosch (the amateur version) to the Bosch professional unit. The tingling in my forearms from the vibrations emanating from the cheaper unit became all too much to bear (cheaper tools?).
Based on comments from other builders about the issues associated with stains under epoxy resin, I decided to use the Behlen Solar-Lux stains which are a solvent based dye. A 50/50 mix of red and mahogany brown gave the colour that I wanted and the stain was sprayed on to ease the task. In retrospect, the dark color was something of fateful decision as it made the task of getting a transparent fibreglass layer much more difficult. Indeed, if I had my time over, I would dispense with the fibreglass on the sides altogether and just use epoxy resin. But that is another story.
By March, the hull was sanded, stained and looking good.
