
Hand Crafted Wood Cleats
Posted by Gregory Rehill on Dec 11th 2020
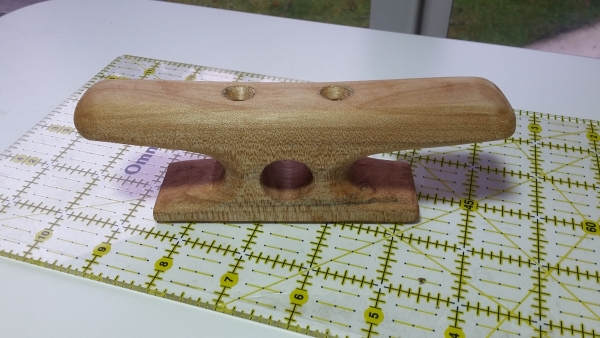
When you build a wood boat, spend hours making the wood look just right, how about a nice finishing touch, a hand crafted wood cleat?
There are some design references to work with, but nothing I could find that explained the dimensions for such a hard working item on a boat. A cleat must hold the total mass of the boat from breaking free in a storm, hold the boat secure in its moorage, and withstand the surge of boat wakes plus numerous other functions, all of which require a reliable device suitably attached to the boat. The most informative was "The Marlinspike Sailor" by Hervey Garrett Smith and "The Ashley Book of Knots" by Clifford Warren Ashley.
Visit the
Cleat Gallery
Cleat Material
The wood you choose for a cleat should be strong, and rot resistant. That eliminates just about all the softwoods like pine, spruce, cedar and most other conifers. A close grained fir or tamarack (larch) may work, but the wood is brittle and splinters and cracks easy. There are lots of hardwoods that will perform nicely in a marine environment; teak, hickory, ash, cypress, oak, maple, Iroko, chestnut, mahogany, and numerous others. The wood you choose should be straight grained, and non porous. Last thing you want is a wood that will wick up water and rot.
Types of Cleats
The history of cleats goes back as far as thousands of years when the first mariners wanted to secure a line to hold a sail in position. Various pegs and pins were used on the tall ships. These went into a hole in a rail. Pegs were driven in and were more or less permanent, whereas belaying pins fitted loosely into the hole and could be removed or re-positioned. The use of a horned cleat became popular as recreational boating grew.
The Layout

| Rope Dia. | Overall Length | Overall Width | Screw size | Drill | Safety hole | Bolt Spacing | Rope Seat Center | Seat height | Soul Length | Horn Height | Base Height | Cleat Height | Safety hole height |
| K | A | W | # | L | J | C | B | D | F | G | E | H | M |
| 1/ 4 | 3 | 1/ 2 | 10 | 3/16 | 3/ 8 | 1 | 2 1/8 | 7/16 | 3 | 1/ 4 | 3/16 | 1 3/16 | 3/ 4 |
| 5/16 | 3 3/ 4 | 5/ 8 | 12 | 7/32 | 7/16 | 1.25 | 2 5/8 | 19/32 | 3 3/4 | 5/16 | 1/ 4 | 1 1/ 2 | 31/32 |
| 3/ 8 | 4 1/ 2 | 3/ 4 | 14 | 1/ 4 | 1/ 2 | 1.25 | 2 3/ 8 | 5/ 8 | 3 3/4 | 3/ 8 | 1/ 4 | 1 3/ 4 | 1 1/16 |
| 1/ 2 | 6 | 1 | 16 | 17/64 | 5/ 8 | 1.5 | 2 23/32 | 11/16 | 4 1/2 | 3/ 8 | 1/ 4 | 2 1/ 8 | 1 1/ 4 |
| 5/ 8 | 7 1/ 2 | 1 1/ 4 | 18 | 19/64 | 3/ 4 | 1.75 | 3 7/8 | 1 | 5 1/4 | 1/ 2 | 3/ 8 | 2 3/ 4 | 1 11/16 |
| 3/ 4 | 9 | 1 1/ 2 | 20 | 5/16 | 7/ 8 | 2 | 4 1/2 | 1 1/16 | 6 | 1/ 2 | 3/ 8 | 3 1/ 8 | 1 7/ 8 |
Construction
Using well seasoned or kiln dried wood, cut the cleat blocks to the Length, Width and Thickness desired for the rope being used. For best strength, the grain should be at right angles to the bolt holes.
Make a full scale template on graph paper of the side view and the top view. The only items you need are a base line, a center line, the overall length (A), the rope seat center and height (B & D), the safety hole height (M) to position all the holes in the correct position.
| Top layout | |||
| Rope Dia. | Length | Width | Bolt hole |
| K | A/2 | W/2 | C/2 |
| 1/ 4 | 1 1/ 2 | 1/ 4 | 1 1/16 |
| 5/16 | 1 7/ 8 | 5/16 | 1 5/16 |
| 3/ 8 | 2 1/ 4 | 3/ 8 | 1 3/16 |
| 1/ 2 | 3 | 1/ 2 | 1 23/64 |
| 5/ 8 | 3 3/ 4 | 5/ 8 | 1 15/16 |
| 3/ 4 | 4 1/ 2 | 3/ 4 | 2 1/ 4 |
| Side Layout | |||||
| Rope Dia. | Length | Height | Rope Seat | Safety Hole | |
| K | A/2 | H | B/2 | D | M |
| 1/4 | 1 1/ 2 | 1 3/16 | 1 1/16 | 7/16 | 3/ 4 |
| 5/16 | 1 7/ 8 | 1 1/ 2 | 1 5/16 | 19/32 | 31/32 |
| 3/8 | 2 1/ 4 | 1 3/ 4 | 1 3/16 | 5/ 8 | 1 1/16 |
| 1/2 | 3 | 2 1/ 8 | 1 23/64 | 11/16 | 1 1/ 4 |
| 5/8 | 3 3/ 4 | 2 3/ 4 | 1 15/16 | 1 | 1 11/16 |
| 3/4 | 4 1/ 2 | 3 1/ 8 | 2 1/ 4 | 1 1/16 | 1 7/ 8 |

Position the template on your block(s) and using a sharp point, like the point on a drawing compass, transfer the drilling points to the wood. Drill the holes. For the bolt holes a brad point drill is recommended, and for the side holes, Forsner bits are recommended.
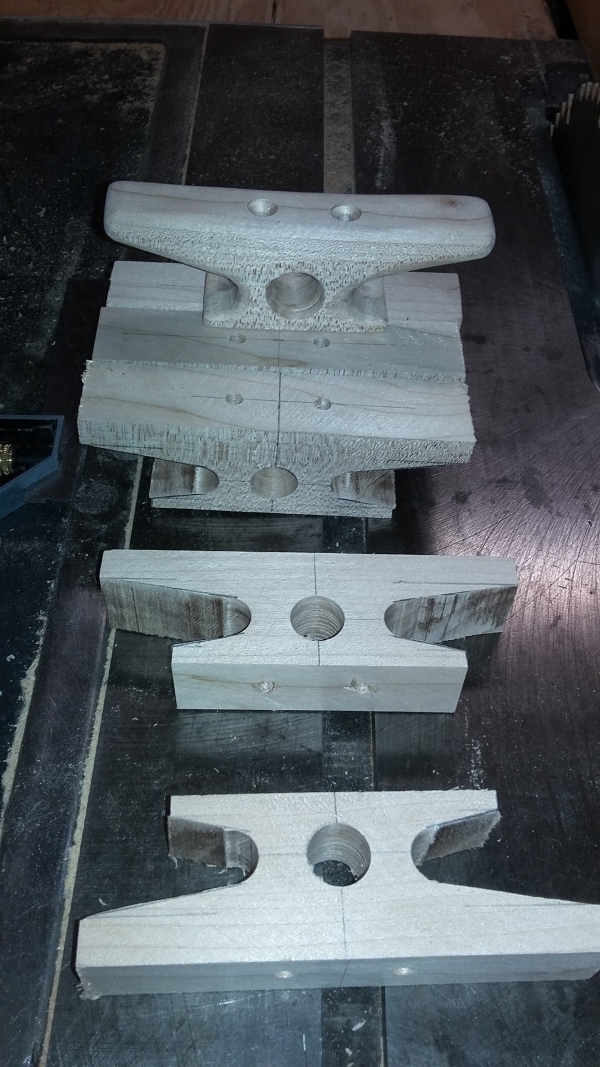
Layout the cut lines
Two cuts are needed on each end of the block, from the top of the rope seat hole to the bottom of the horn, and from the bottom of the rope seat to the top of the cleat sole. Scribe the lines and cut on the side nearest the middle to make a nice transition between the rope seat hole and the body of the cleat.

Rounding edges and shaping the horns
See Notes on Bending Radius of Rope
A rasp and a rat tail file are good, but a drill powerd rotary rasp roughs out the shape quickly and finishing with hand rasps, files then sandpaper fairly quickly. The rope seat needs to have a really good radius so the seat contact area is almost a semi circle from one side to the other.
The top sides of the horns can be planed down and radiused quite aggressively with about a 1/2" to 3/4" radius. The top center area can be dished to 1/8" to 3/16" so the horns have an upward shape. This will help lock the running part of the single hitch or a slippery hitch.

Notes on Design and Dimensions
Length of Cleat
From the Marlinspike Sailor, the length of the cleat should be 12 times the rope diameter.
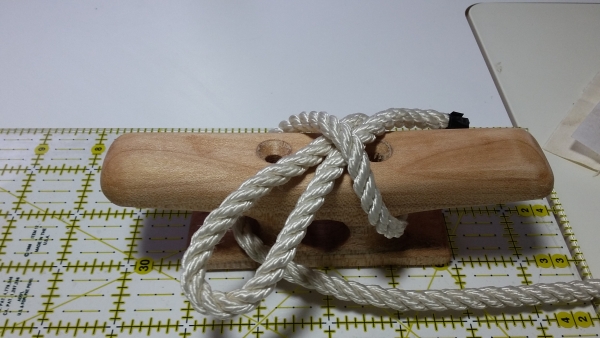
Safety Hole
Traditional cleats had this hole to put the bitter end of the rope through and tie a figure 8 knot so as not to lose the line in the wind or worse yet, prevent the line from running up the mast when the sails lowered. The one modification done was to put the bottom of the safety hole above the top of the seat so as not to interfere with the bite of the rope.
Bending Radius
Copied from the "Samson Rope Information Sheet - Rope Selection, Use and Inspection"
Any sharp bend in a rope under load decreases its strength substantially and may cause premature damage and failure. In sizing the radius of bitts, fairleads and chocks the following guidelines are offered:
Where a rope bends more than 10 degrees around bitts, chocks or across any surface, the diameter of the contact surface should not be less than 3 times the rope diameter.
A ratio of 4 to 1 (or larger) would be better because the rope durability increases as the diameter of the surface over which it is worked increases.The ratio of the length of an eye to the diameter of the object over which it is being placed should be a minimum of 3 to 1 and preferably 5 to 1. In other words, if you have a 2 Ft. diameter bollard, the eye length should be a minimum of 6 Ft. and preferably 10 Ft. By using this ratio, the base of the eye will be spared from tearing or parting. Thimbles are normally designed for use at a 3 to 1 ratio.
To achieve this in the cleat, the circumference of a circle is pi*d, pi=3.14, (the 3 we need for the ratio) and the contact area is about a half circle, therefore 2 times the rope diameter for the thickness of the cleat will yield the 3:1 ratio.
Center to center of the rope seats, bolt spacing and the safety hole
The bolt holes need to be tight to the bolt or screw used to secure the cleat. Any movement will most likely result in the cleat failure. The amount of wood between the rope seat, the bolt and the safety hole should be sufficient to keep the rope from pulling the cleat into the bolt by crushing the wood between the two. A thickness of wood equal to the diameter of the bolt should be adequate. There are 6 layers material between the rope seats, each equal to the thickness of the bolt.
Formula used to calculate the dimensions
Rope Diameter = K = 1/2"
Overall length = 12*K = 1/2 x 12 = 6"
Overall width = 2*K =1/2 x 2 = 1"
Bolt Spacing = J+(3*L) =5/8" + 3*17/64 (round up to the nearest 16th inch) = 1 7/16"